
Introduction
If you've ever had to deal with firewalls and complex ACLs, you'll know that they can be tricky beasts from time to time! Whether it's having to generate your firewall configuration for different vendors or wading through the jungle of nested object groups to add a new host. Whatever your experience, it's an area where automation can really help. In this article, we will look at a tool that does just that - Aerleon.
Before we dive in, the code examples from this post can all be found in the following repo:
 packetcoders
What is Aerleon?
Aerleon is a multi-vendor ACL generation tool. As per the Aerleon documentation, it allows you to:
Generate firewall configs for multiple firewall platforms from a single platform-agnostic configuration language through a command line tool and Python API.
In other words, you define your ACL inputs and pass them into Aerleon, telling it your platform type, and from there, you are returned with your generated config.
Some other great things to mention about Aerleon are that it:
- Supports many different vendors/platforms, including Arista, Juniper, Cisco, IPTables, K8, and others.
- Provides the ability to extend out the supported platforms via plugins.
- Allows you to cleanly group and nest your services and networks.
- Allows you to define your ACLs and network/services in YAML.
- Provides a CLI and Python modules.
- Provides rule shadow checking (similar to Batfish's
filterLineReachability()question).
If you've used Capirca, you may be asking, what's the difference?
Well, the first thing to mention is that Aerleon is a fork of Capira. The key problem with Capirca was that it only supported ACL inputs in Capirca's native format. This meant if you wanted to pull the ACL data from a dynamic inventory such as NetBox or even a static inventory (think Nornir), it was extremely difficult. Not only this, but due to Capirca's native policy format, we could not use linting tools such as yamllint to automate the checking of syntax or formatting issues.
| Aerleon | Capirca | |
| ACL inputs** via CLI | YAML | Capirca native format |
| ACL inputs** via Python | Python dictionaries | Capirca native format |
**ACL inputs == policy and definition files.
Note: Aerleon also still accepts the Capirca native format, so you can use Aerleon as a direct replacement if you previously used Capirca.
Installing Aerleon
Aerleon can be installed by simply running the following:
$ poetry add aerleon
Or if you are using Pip, pip install aerleon.
As mentioned at the beginning of this post, all of the scripts and examples from this post can be found on GitHub within our aerleon_acl_gen_demo repo. Therefore if you want to follow along using this repo, perform the following:
$ git clone git@github.com:packetcoders/aerleon_acl_gen_demo.git
$ cd acl_gen_demo

$ poetry install
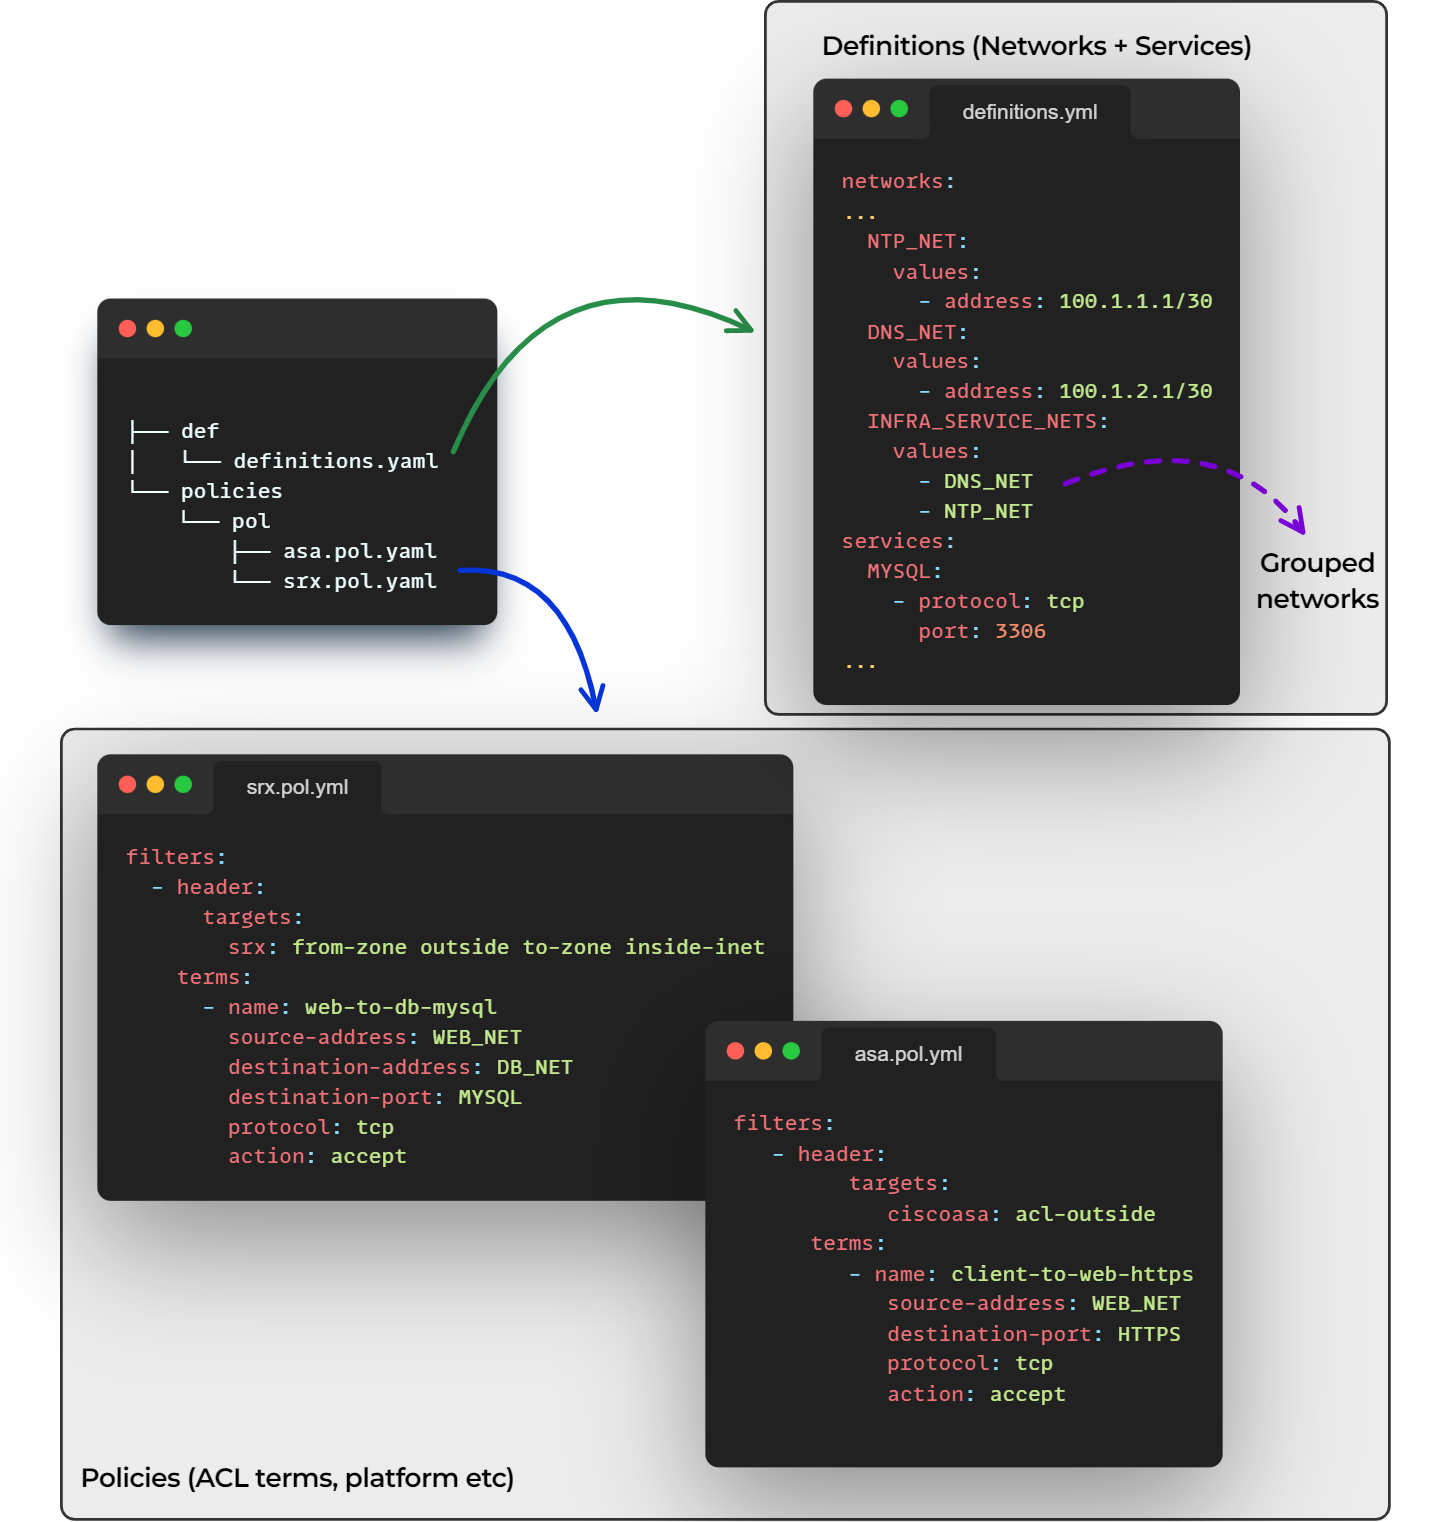
Components
Aerleon generates the ACLs based on a few inputs. These are:
- Policies files, the terms of your ACL filters (source, destinations, etc.).
- Definition files, your different networks, and services. These are then referenced from within your policy files.
Here's an overview of the components based on using YAML files:
Running Aerleon
Let's step through the main ways we can render our ACLs with Aerlon.
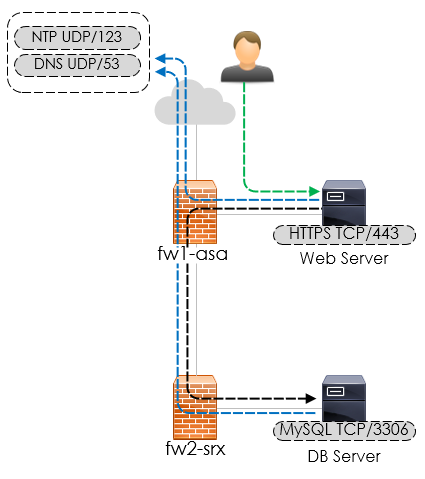
Before we do, the configuration we will be rendering will be based on the following topology:
CLI
To run Aerleon, we can either use the CLI, which will render our ACLs using our policy and definition YAML based inputs, like so:
$ aclgen
I0126 11:58:53.221615 140447367231296 aclgen.py:451] finding policies...
W0126 11:58:53.222954 140447367231296 aclgen.py:369] --> policies/pol (2 pol files found)
I0126 11:58:53.256639 140447367231296 plugin_supervisor.py:249] 0 plugins active.
I0126 11:58:53.256868 140447367231296 plugin_supervisor.py:250] 27 generators registered.
I0126 11:58:53.258465 140447367231296 aclgen.py:298] file changed: srx.pol.srx
I0126 11:58:53.258757 140447367231296 plugin_supervisor.py:249] 0 plugins active.
I0126 11:58:53.259043 140447367231296 plugin_supervisor.py:250] 27 generators registered.
I0126 11:58:53.273001 140447367231296 aclgen.py:384] writing 1 files to disk...
I0126 11:58:53.273808 140447367231296 aclgen.py:403] writing file: srx.pol.srx
I0126 11:58:53.274315 140447367231296 aclgen.py:517] done.
Once run, we then can see the generated ACLs,
$ head asa.pol.asa
clear configure access-list acl-outside
access-list acl-outside remark $Id:$
access-list acl-outside remark $Date:$
access-list acl-outside remark $Revision:$
access-list acl-outside remark client-to-web-https
access-list acl-outside extended permit tcp host 10.1.1.1 any eq https

$ head srx.pol.srx
security {
    replace: address-book {
        global {
                address DB_NET_0 172.16.1.1/32;
                address DNS_NET_0 100.1.2.0/30;
                address NTP_NET_0 100.1.1.0/30;
                address WEB_NET_0 10.1.1.1/32;
                address-set DB_NET {
                    address DB_NET_0;
                }
Python API
Or we can use the Python API. Here are the steps (note for brevity we will only render the ASA configuration):
- We create our definitions (network and services) like so:
networks = {
    "networks": {
        "WEB_NET": {"values": [{"address": "10.1.1.1/32"}]},
        "DB_NET": {"values": [{"address": "172.16.1.1/32"}]},
        "NTP_NET": {"values": [{"address": "100.1.1.1/30"}]},
        "DNS_NET": {"values": [{"address": "100.1.2.1/30"}]},
        "INFRA_SERVICE_NETS": {"values": ["DNS_NET", "NTP_NET"]},
    },
}

services = {
    "services": {
        "MYSQL": [{"protocol": "tcp", "port": 3306}],
        "HTTPS": [{"protocol": "tcp", "port": 443}],
        "DNS": [{"protocol": "udp", "port": 53}],
        "NTP": [{"protocol": "udp", "port": 123}],
    }
}
- Next we create our policy (for this example we will only create an ACL for a single firewall).
cisco_asa_policy = {
    "filename": "cisco_asa_policy",
    "filters": [
        {
            "header": {"targets": {"ciscoasa": "acl-outside"}},
            "terms": [
                {
                    "name": "client-to-web-https",
                    "source-address": "WEB_NET",
                    "destination-port": "HTTPS",
                    "protocol": "tcp",
                    "action": "accept",
                },
                {"name": "deny-all", "action": "deny"},
            ],
        },
        {
            "header": {"targets": {"ciscoasa": "acl-dmz"}},
            "terms": [
                {
                    "name": "web-to-db-mysql",
                    "source-address": "WEB_NET",
                    "destination-address": "DB_NET",
                    "destination-port": "MYSQL",
                    "protocol": "tcp",
                    "action": "accept",
                },
                {
                    "name": "web-to-infra-svcs",
                    "source-address": "WEB_NET",
                    "destination-address": "INFRA_SERVICE_NETS",
                    "destination-port": ["DNS", "NTP"],
                    "protocol": "udp",
                    "action": "accept",
                },
                {"name": "deny-all", "action": "deny"},
            ],
        },
        {
            "header": {"targets": {"ciscoasa": "acl-inside"}},
            "terms": [
                {
                    "name": "db-to-dns",
                    "source-address": "DB_NET",
                    "destination-address": "DNS_NET",
                    "destination-port": "DNS",
                    "protocol": "udp",
                    "action": "accept",
                },
                {
                    "name": "db-to-ntp",
                    "source-address": "DB_NET",
                    "destination-address": "NTP_NET",
                    "destination-port": "NTP",
                    "protocol": "udp",
                    "action": "accept",
                },
                {"name": "deny-all", "action": "deny"},
            ],
        },
    ],
}
- Now we have our policy and definitions in place, we can render our ACL.
Here are the steps with some inline comments to guide you.
# Import re for removing unwanted lines after render
import re

# Import the naming module and the api module from the aerleon library.
from aerleon.lib import naming
from aerleon import api

# Create an instance of the Naming class
definitions = naming.Naming()

# Parse the "networks" object
definitions.ParseDefinitionsObject(networks, "networks")

# Parse the "services" object
definitions.ParseDefinitionsObject(services, "services")

# Generate configurations from the "cisco_asa_policy" object,
# passing in the definitions object as an argument
configs = api.Generate([cisco_asa_policy], definitions)

# Render the ASA configuration from the configs object
acl = configs["cisco_asa_policy.asa"]

# Remove erroneous blank lines from rendered ACLs
acl = re.sub("\n\n\n", "\n", acl)

# Print the ACL
print(acl)
From here your'll get your newly rendered ACL. Like so:
…
clear configure access-list acl-dmz
access-list acl-dmz remark $Id:$
access-list acl-dmz remark $Date:$
access-list acl-dmz remark $Revision:$
access-list acl-dmz remark web-to-db-mysql
access-list acl-dmz extended permit tcp host 10.1.1.1 172.16.1.1/32 eq 3306
access-list acl-dmz remark web-to-infra-svcs
access-list acl-dmz extended permit udp host 10.1.1.1 100.1.1.0/30 eq domain
access-list acl-dmz extended permit udp host 10.1.1.1 100.1.1.0/30 eq ntp
access-list acl-dmz extended permit udp host 10.1.1.1 100.1.2.0/30 eq domain
access-list acl-dmz extended permit udp host 10.1.1.1 100.1.2.0/30 eq ntp
access-list acl-dmz remark deny-all
access-list acl-dmz extended deny ip any any
…
Outro
In this post, we have covered some of the basics of Aerleon. Aerleon is a great tool; with the new additions over Capirca, we can now integrate it fully with tools such as NetBox and Nornir.
Well, that wraps up this post. Thank you for reading, and I hope you found this post useful. If you have any further questions or comments, feel free to reach out. Have a great day!
Sponsored by