
Introduction
If you've automated the generation of your network configuration, chances are you've used Jinja. If not,
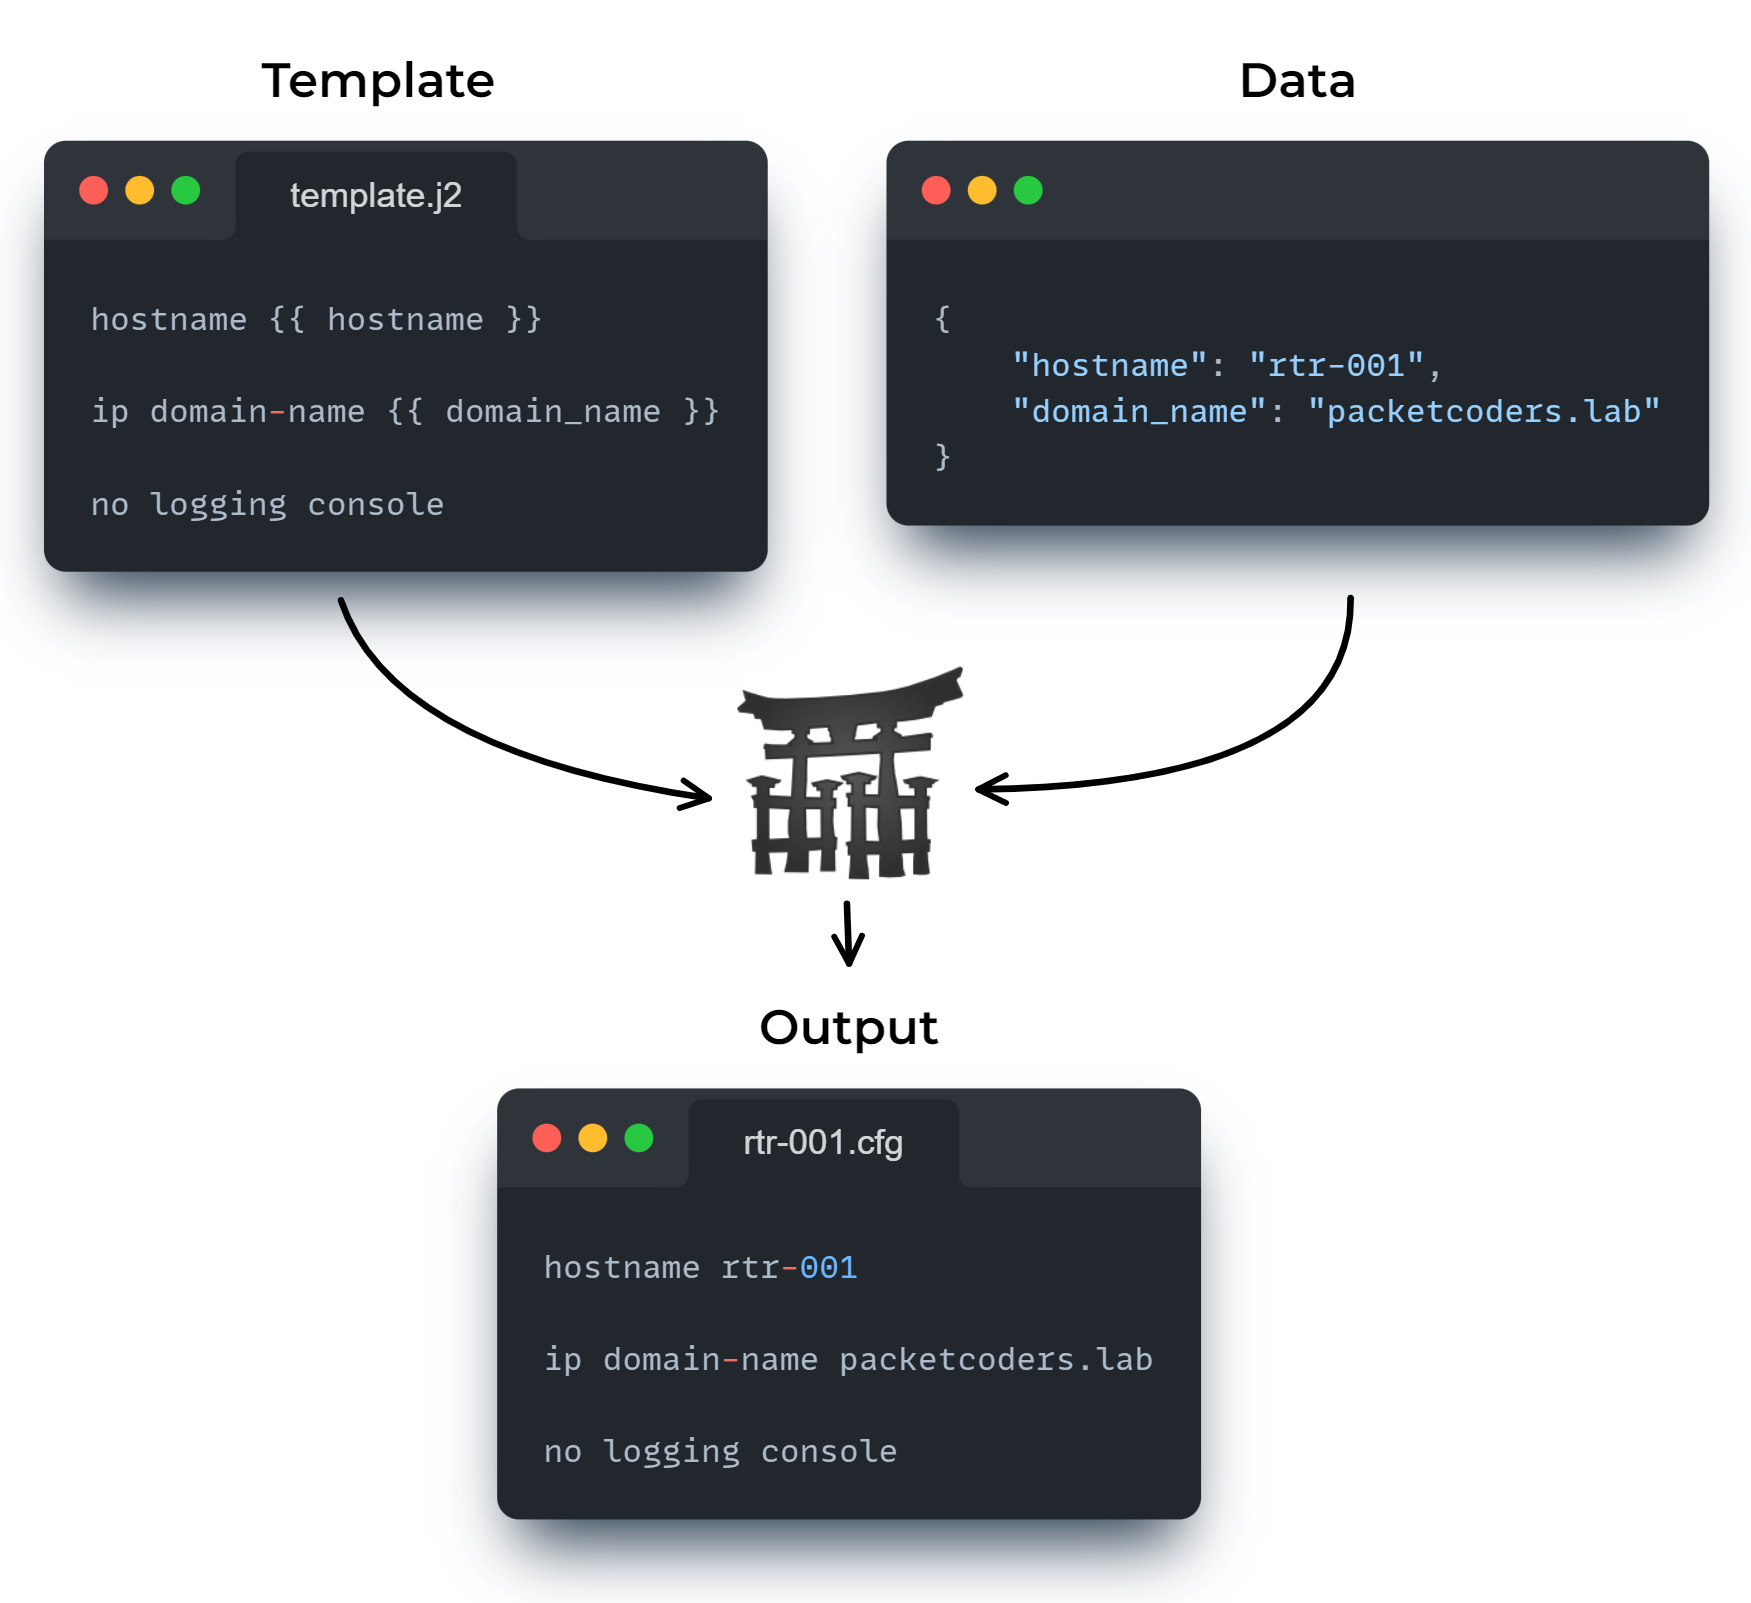
Jinja is a templating engine used to generate text-based files from data input.
Below shows a quick example:
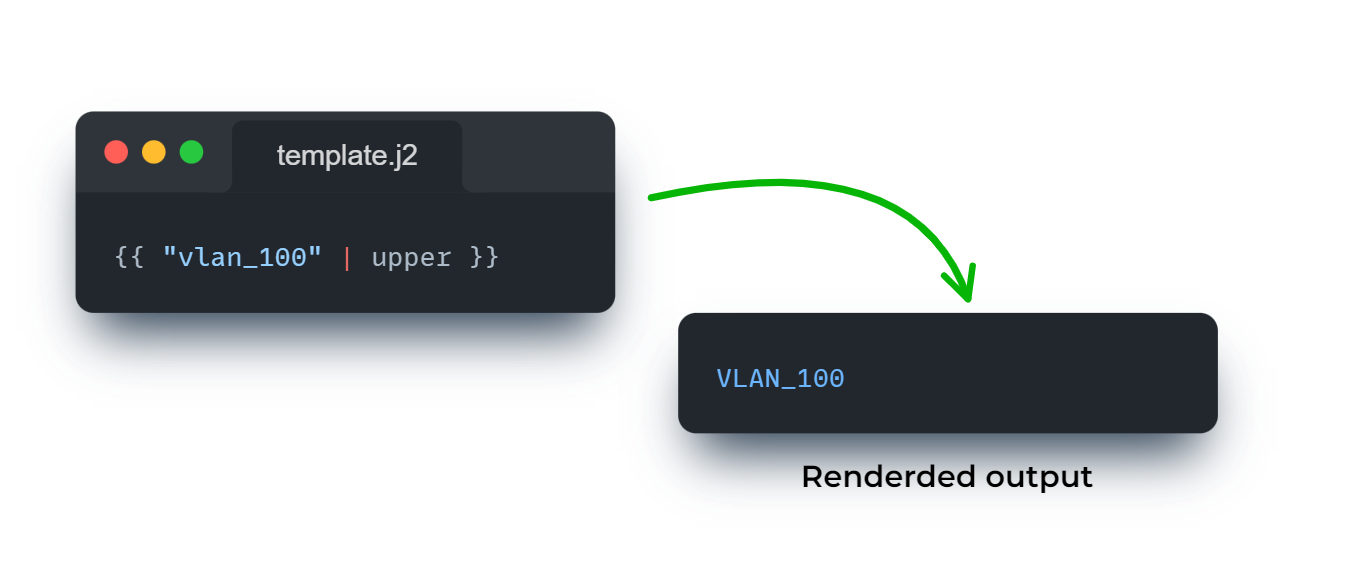
One feature that Jinja provides is filters. Filters allow you to modify a variable within a template by supplying a | and then the filter name.
Here’s a quick example of using the upper filter to convert our data into uppercase.
Jinja provides 2 types of filters - in-built and custom.
- In-built filters come out of the box and are ready to use. A full list of built-in filters can be seen here.
- Custom filters allow us to define and build our own filters using Python functions.
Within this article we are going to show you how to integrate Jinja custom filters within Nornir to allow us to split the IP and netmask data from a variable such as 10.1.1.1/24, so that we can use them within our template.
Nornir Overview
As we mentioned before, this post is about integrating custom Jinja filters within Nornir. If you are new to Nornir,
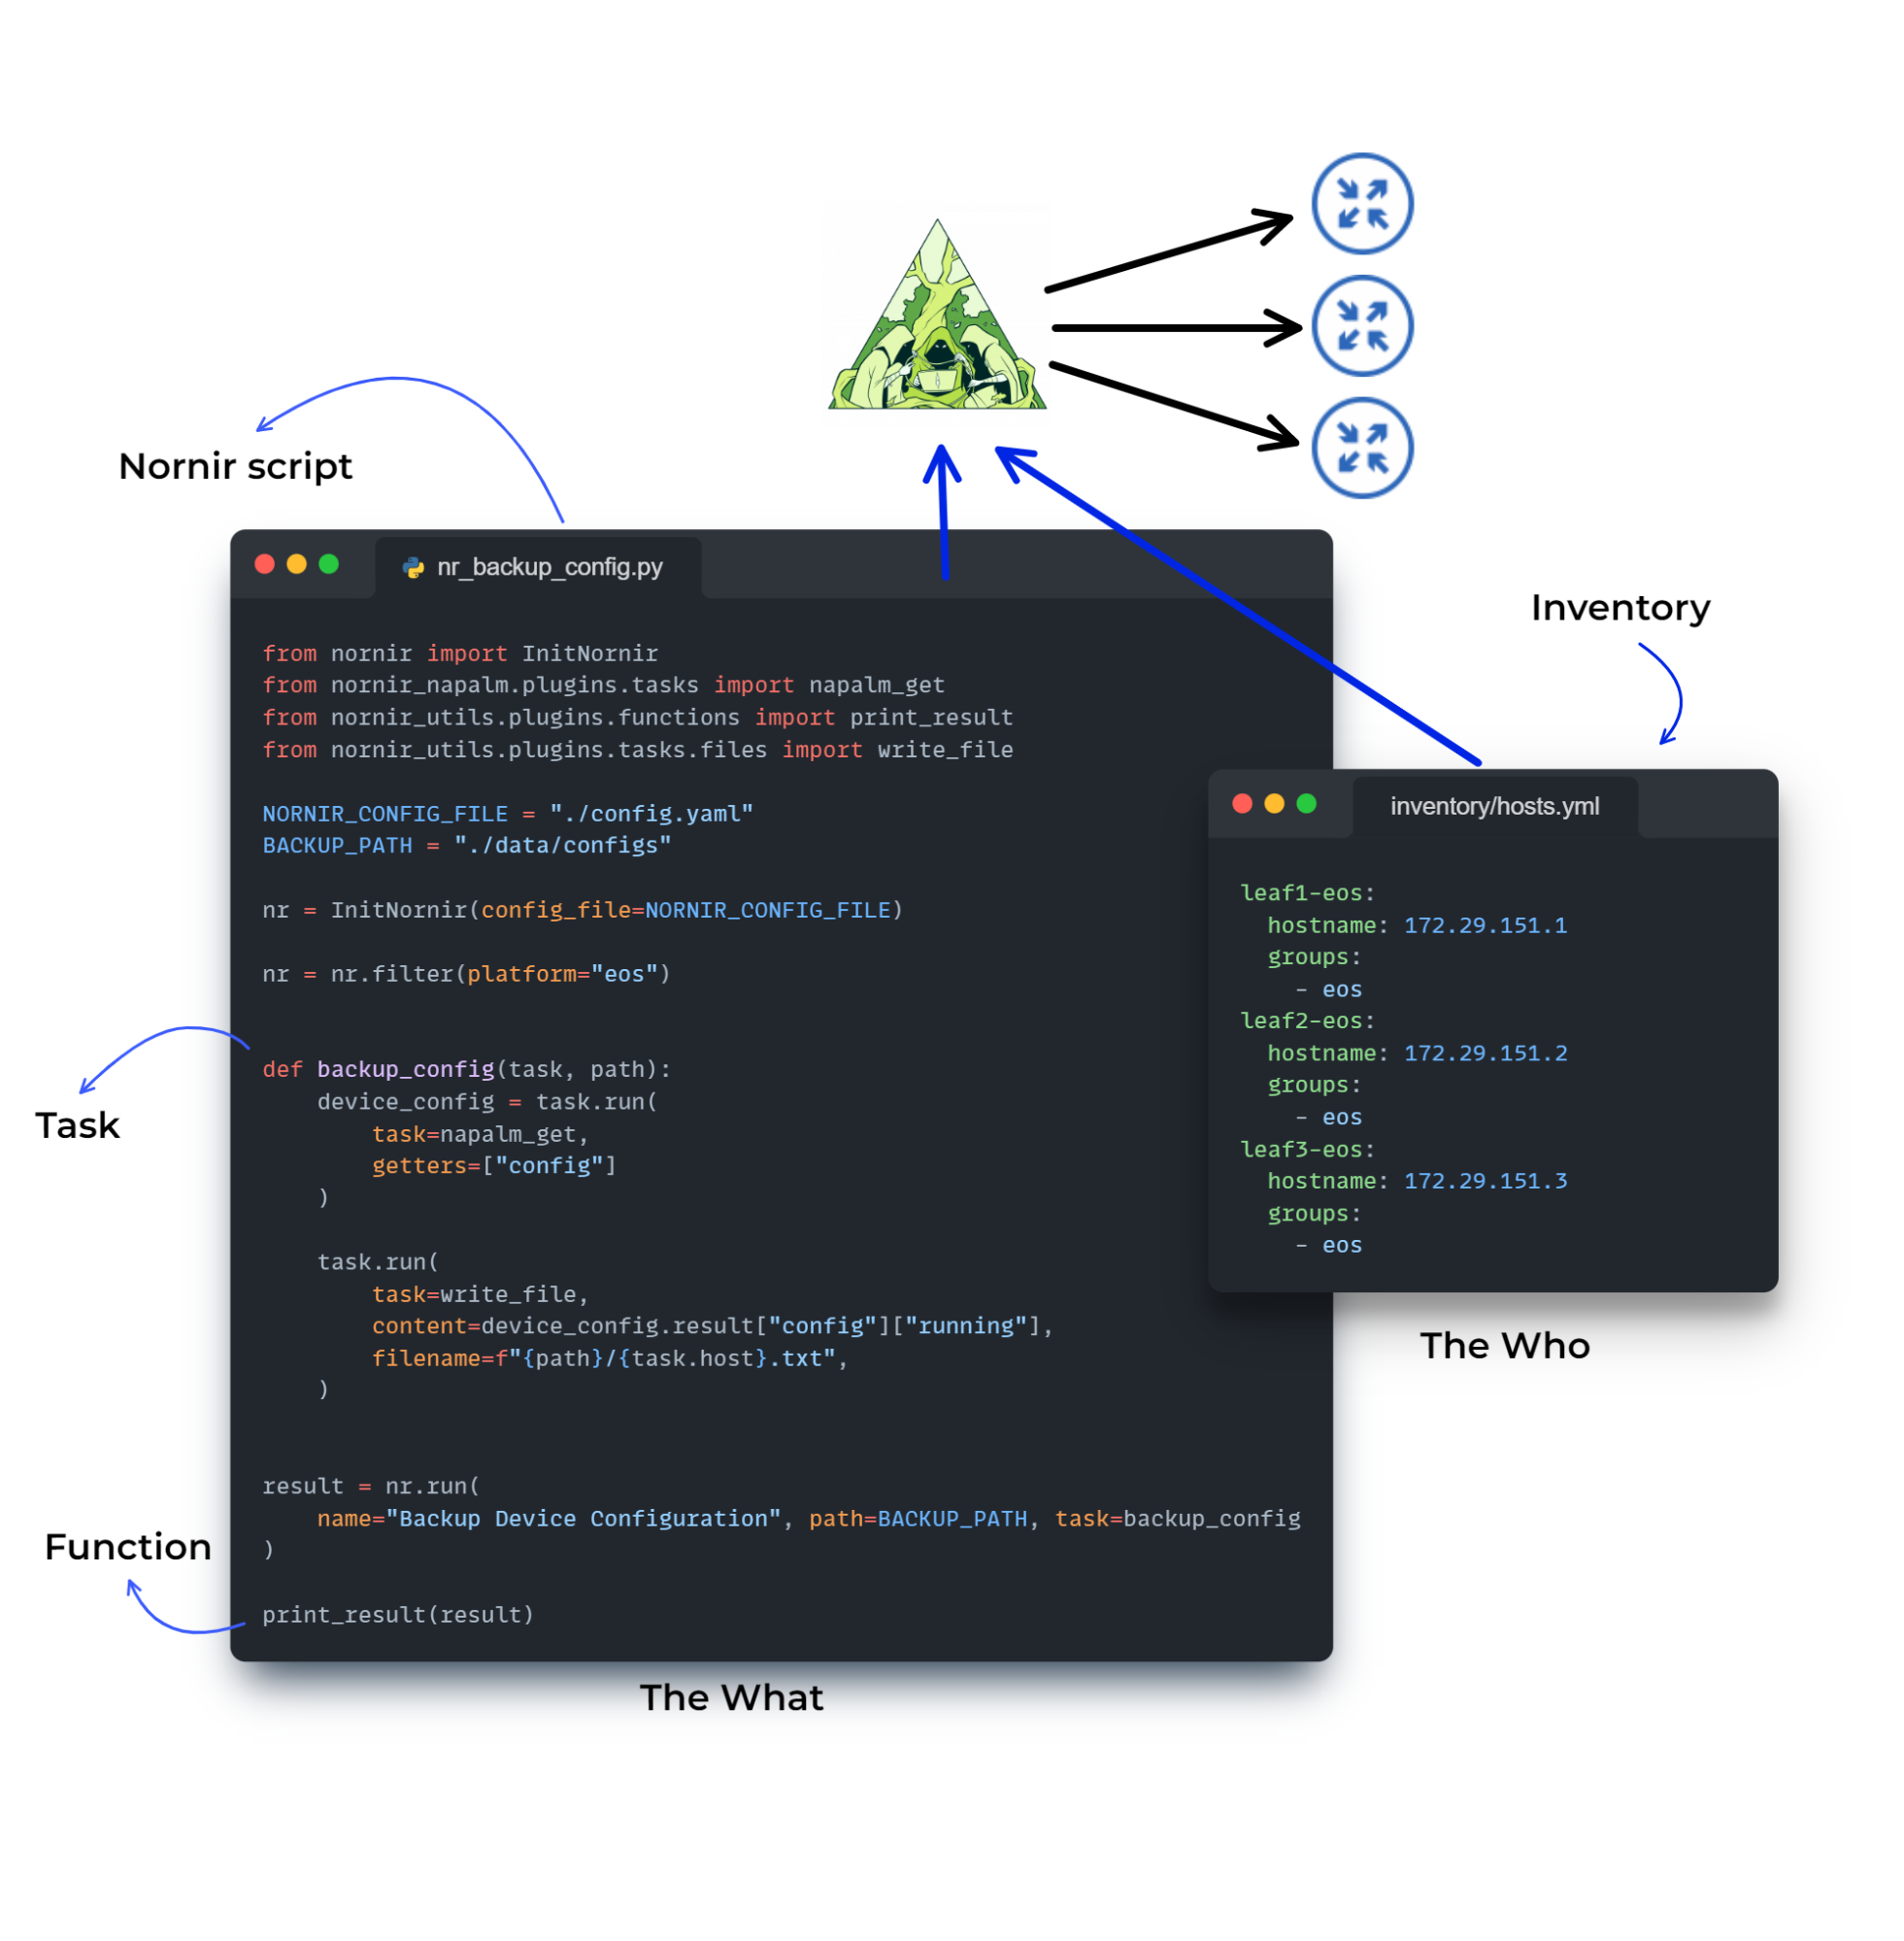
Nornir is a 100% Python, open-source multi-threaded framework with inventory management for automating groups of devices.
In other words, Nornir offers:
- Concurrency via multi-threading
- Inventory management
- Plug-in support for various tools such as Scrapli, Netmiko and NAPALM
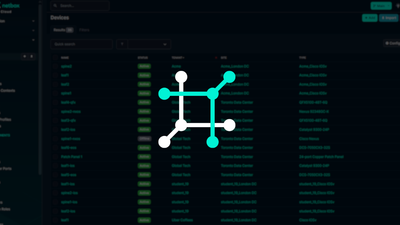
Below shows you an overview of some of Nornir’s main components:
Nornir Integration
Integration Overview
Our integration will be based on creating 2 custom filters, ip and netmask. These filters will take an input of an IP and CIDR, for example 10.1.1.1/24, and then return the IP (10.1.1.1) or subnet mask (255.255.255.0), based upon the filter provided.
But how do we actually create these custom filters and use them in Nornir? The way it works is this. We create some standard Python functions (aka our filters). We use the Nornir Jinja2 plug-in and then supply these functions as jinja_filters. From there we can then use these filters within our Jinja template. Below shows an example of the various files and inputs:
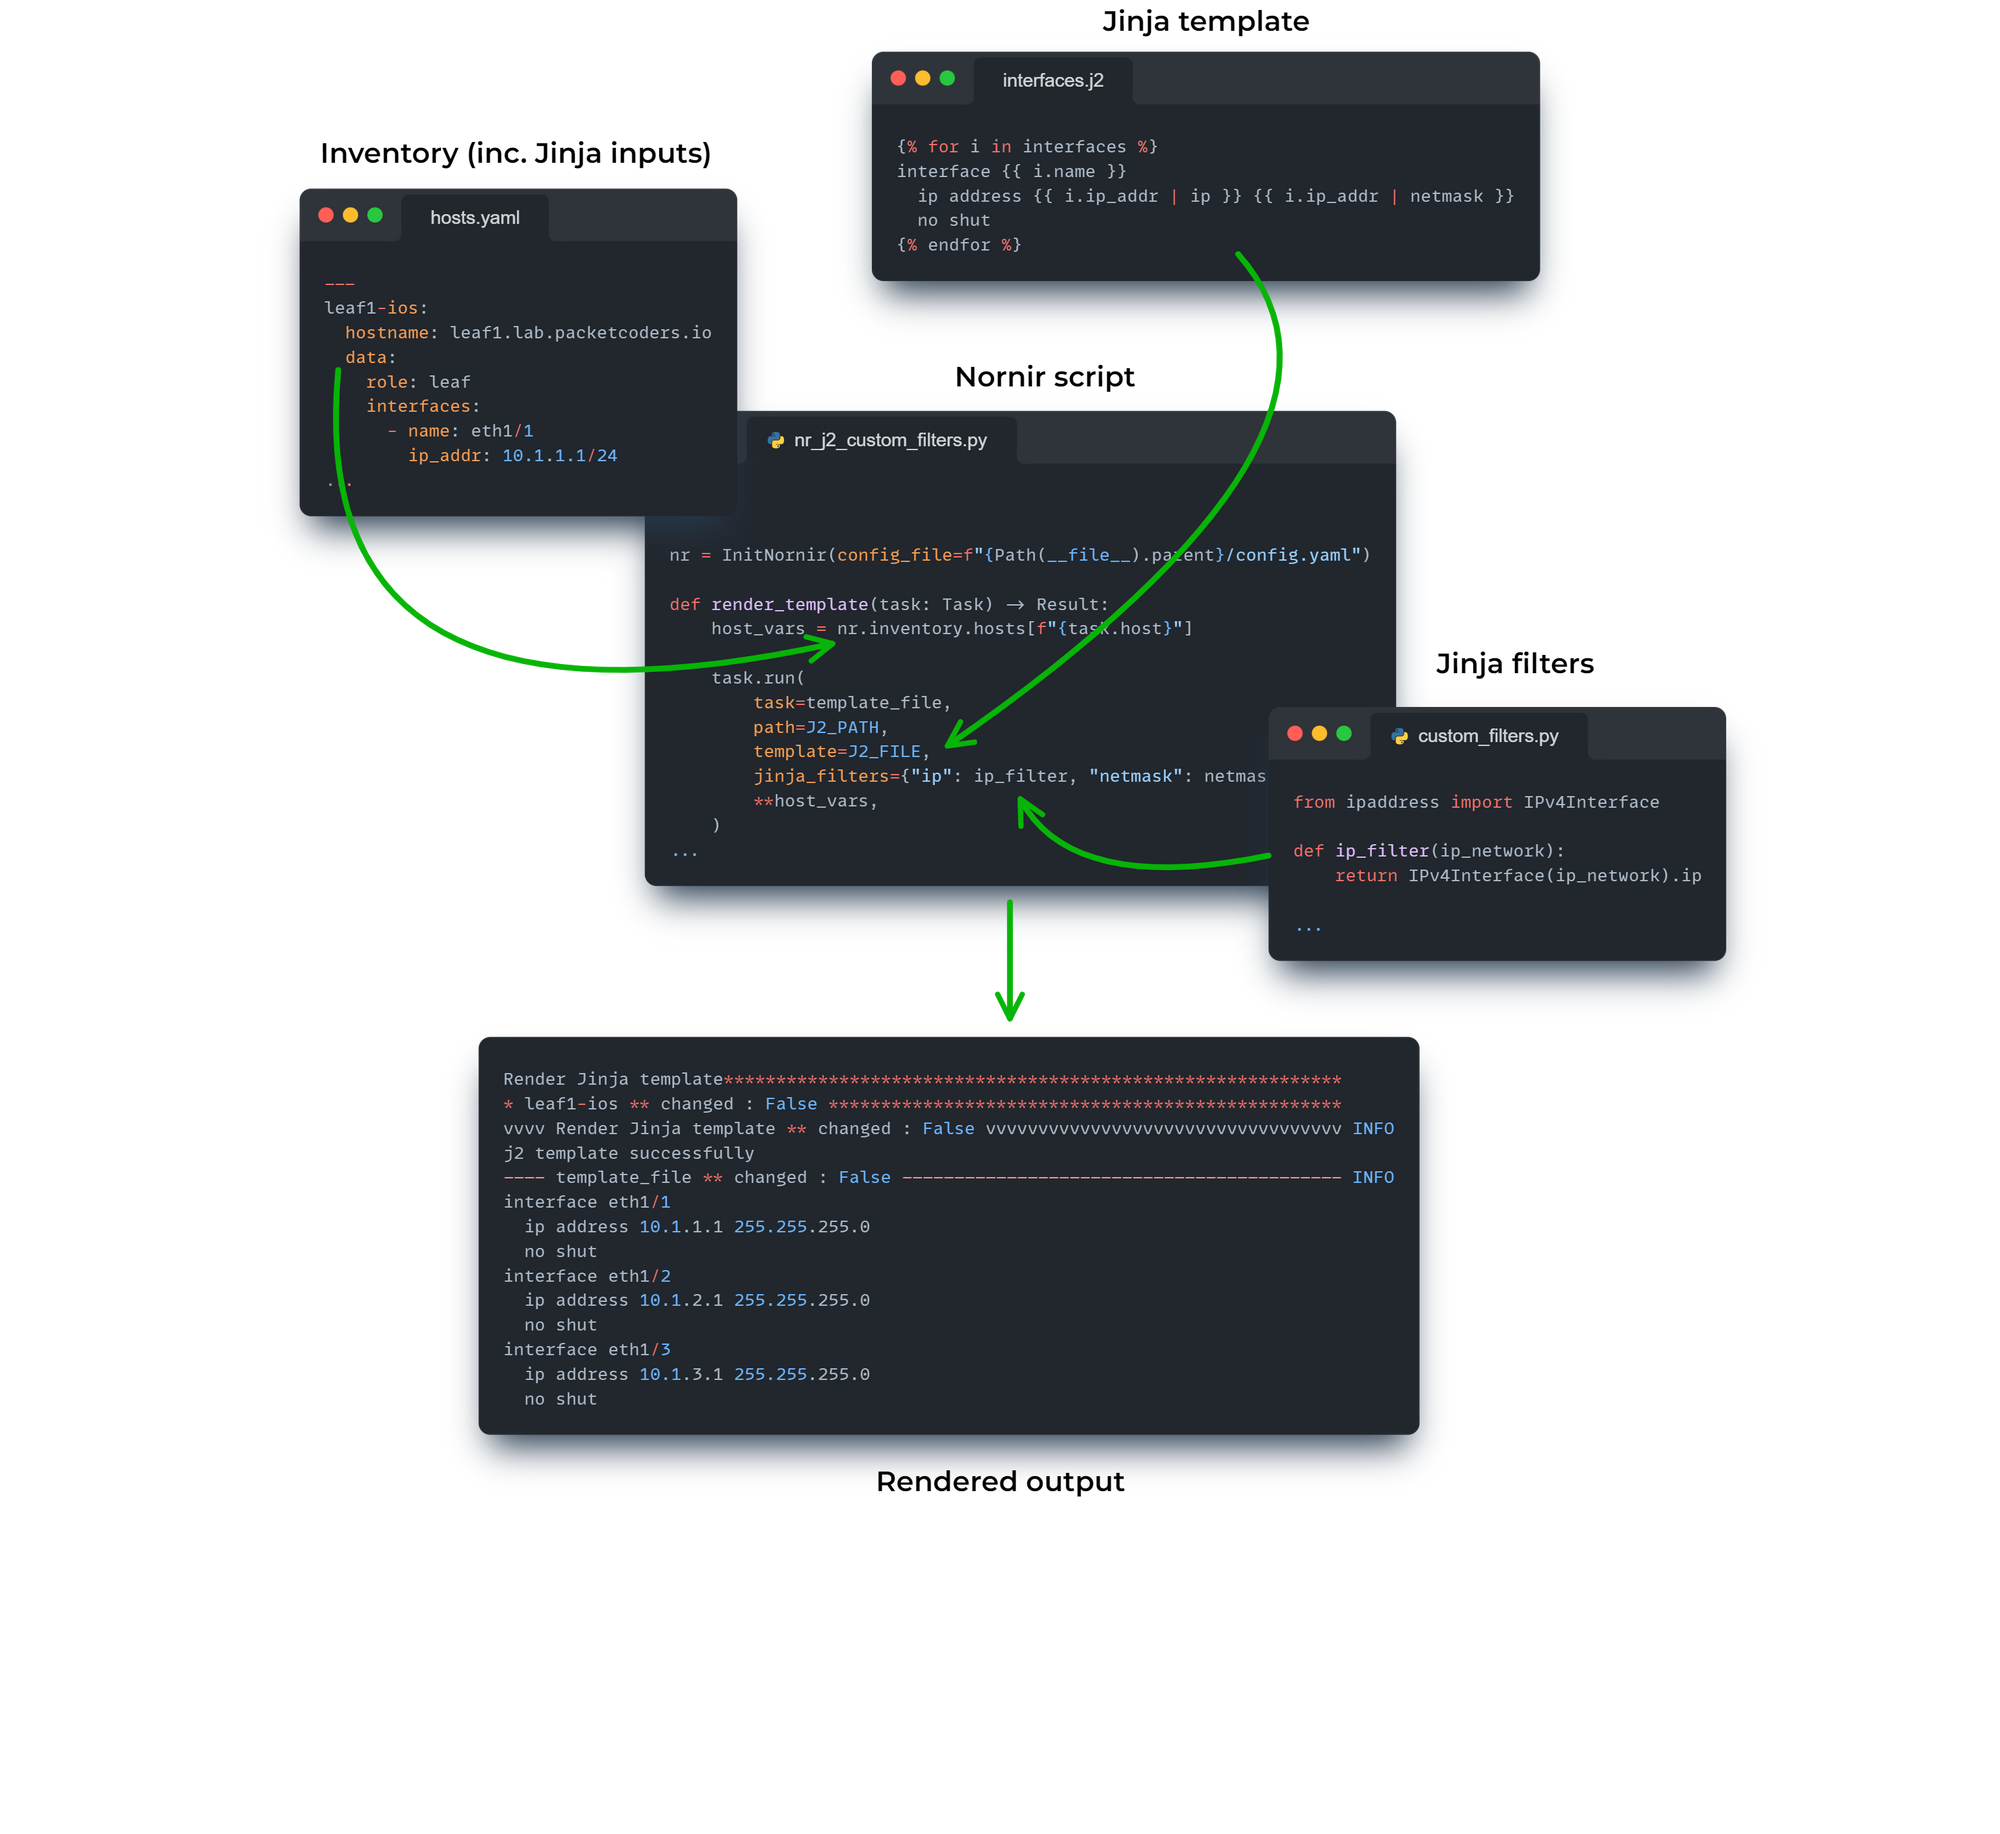
For reference, the file layout for the example (diagram) above is shown below:
.
├── config.yaml
├── inventory
│   └── hosts.yaml
|
├── custom_filters.py
├── nr_j2_custom_filter.py
└── templates
    └── interfaces.j2
Dependencies
The dependencies for this example are nornir, nornir-utils and nornir-jinja2.
To install these via PIP run:
$ pip install nornir nornir-utils nornir-jinja2
Ok. Let’s dive in …
Jinja Custom Filters
First of all, we create our custom filters, which are just Python functions. They take an input, and then return an output. For our use case, we are going to use the ipaddress module and the IPv4Interface class to determine the IP and subnet from our input.
custom_filters.py
from ipaddress import IPv4Interface


def ip_filter(ip_network):
    """
    It takes an IP network and returns the IP address

    :param ip_network: The IP address and subnet mask in CIDR notation
    :return: The IP address of the interface.
    """
    return IPv4Interface(ip_network).ip


def netmask_filter(ip_network):
    """
    It takes an IP network in CIDR notation and returns the netmask

    :param ip_network: The IP address and subnet mask in CIDR notation
    :return: The netmask of the ip_network
    """
    return IPv4Interface(ip_network).netmask
Nornir Script
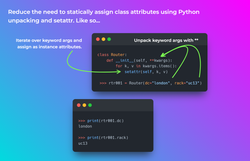
Now that we have created our custom filters, we can supply them to Nornir and the Nornir Jinja2 plug-in via the jinja_filters argument. As you can see the filters are supplied via a dictionary; the custom filter function is the value and the filter name is the key.
The other point to mention within this script is that we get the interface data that we will use within our Jinja template by referencing the inventory data for our host. Like so: nr.inventory.hosts[f"{task.host}"]. It is this data that is then passed into our template via the Jinja2 task plug-in. This is done by unpacking the inventory data that we previously assigned like so, **host_vars.
The rest of the script is described further via the inline comments.
nr_j2_custom_filter.py
#!/usr/bin/env python

from pathlib import Path

from custom_filters import ip_filter, netmask_filter
from nornir import InitNornir
from nornir.core.task import Result, Task
from nornir_jinja2.plugins.tasks import template_file
from nornir_utils.plugins.functions import print_result

# Initialize Nornir against the supplied config file.
nr = InitNornir(config_file=f"{Path(__file__).parent}/config.yaml")

# Variables for Jinja2 template file and path.
J2_PATH = f"{Path(__file__).parent}/templates"
J2_FILE = "interfaces.j2"

# Nornir task
def render_template(task: Task) -> Result:
    """
    It takes a task object, looks up the host_vars for the host in the task, and then runs the
    template_file task, passing in the host_vars as keyword arguments

    :param task: Task - this is the task object that is passed to the callback
    :type task: Task
    :return: A Result object with the host and result attributes.
    """
    # Looking up the host_vars for the host in the task.
    host_vars = nr.inventory.hosts[f"{task.host}"]

    # Running the template_file task, passing in the host_vars as keyword arguments.
    task.run(
        task=template_file,
        path=J2_PATH,
        template=J2_FILE,
        jinja_filters={"ip": ip_filter, "netmask": netmask_filter},
        **host_vars,
    )

    # Returning a Result object with the host and result attributes.
    return Result(host=task.host, result="j2 template successfully")

# Run a task to render a Jinja2 template.
result = nr.run(name="Render Jinja template", task=render_template)

# Condition to ensure code below will only be performed when this module is run (i.e not not imported).
if __name__ == "__main__":
    # Printing the result of the task.
    print_result(result)
Jinja Template
Now that we have our Nornir script we can create our Jinja template, shown below. As you can see, we use our 2 new filters - ip and netmask by passing in i.ip_addr as we loop over our interface data.
templates/interfaces.j2
{% for i in interfaces %}
interface {{ i.name }}
  ip address {{ i.ip_addr | ip }} {{ i.ip_addr | netmask }}
  no shut
{% endfor %}
Jinja Inputs
Here we have our inventory which also contains our input data for our Jinja template. The main point here is that we define the interface data under the data key. The data key within the Nornir inventory is used to specify any arbitrary data.
inventory/hosts.yaml
---
leaf1-ios:
  hostname: leaf1.lab.packetcoders.io
  data:
    role: leaf
    interfaces:
      - name: eth1/1
        ip_addr: 10.1.1.1/24
      - name: eth1/2
        ip_addr: 10.1.2.1/24
      - name: eth1/3
        ip_addr: 10.1.3.1/24
leaf2-ios:
  hostname: leaf2.lab.packetcoders.io
  data:
    role: leaf
    interfaces:
      - name: eth1/1
        ip_addr: 10.1.1.2/24
      - name: eth1/2
        ip_addr: 10.1.2.2/24
      - name: eth1/3
        ip_addr: 10.1.3.2/24
Execute Rendering
Now that we have all the necessary components in place we can execute our Nornir script and render our Jinja template using our new custom filters.
$ ./nr_j2_custom_filter.py
Render Jinja template***********************************************************
* leaf1-ios ** changed : False *************************************************
vvvv Render Jinja template ** changed : False vvvvvvvvvvvvvvvvvvvvvvvvvvvvvvvvvv INFO
j2 template successfully
---- template_file ** changed : False ------------------------------------------ INFO
interface eth1/1
  ip address 10.1.1.1 255.255.255.0
  no shut
interface eth1/2
  ip address 10.1.2.1 255.255.255.0
  no shut
interface eth1/3
  ip address 10.1.3.1 255.255.255.0
  no shut
^^^^ END Render Jinja template ^^^^^^^^^^^^^^^^^^^^^^^^^^^^^^^^^^^^^^^^^^^^^^^^^
* leaf2-ios ** changed : False *************************************************
vvvv Render Jinja template ** changed : False vvvvvvvvvvvvvvvvvvvvvvvvvvvvvvvvvv INFO
j2 template successfully
---- template_file ** changed : False ------------------------------------------ INFO
interface eth1/1
  ip address 10.1.1.2 255.255.255.0
  no shut
interface eth1/2
  ip address 10.1.2.2 255.255.255.0
  no shut
interface eth1/3
  ip address 10.1.3.2 255.255.255.0
  no shut
^^^^ END Render Jinja template ^^^^^^^^^^^^^^^^^^^^^^^^^^^^^^^^^^^^^^^^^^^^^^^^^
Great stuff!
Final Thoughts
I hope you`ve enjoyed this post. As you can see the integration is fairly simple, but the potential for what can be added and achieved via custom filters is endless.
Thanks for reading, and happy packet coding!
Sponsored by