
Introduction to TextFSM
In this blog post, we will look at TextFSM, a tool that helps parse the raw data (semi-structured) we often get from network devices. If you've ever tried to use TextFSM documentation, you might know it can be a bit confusing. Therefore in this post, we'll go through some examples to show you what TextFSM is, the problem it solves, and how you can use it in your network automation workflow. By the end of this post, you should have a clear understanding of how to implement TextFSM to make your network automation tasks a bit easier.
You might be surprised to learn that TextFSM was created by Google. It's primarily designed to extract and parse the semi-structured data that comes from network devices. Here is the official definition:
TextFSM is a Python module that implements a template-based state machine for parsing semi-formatted text. Originally developed to allow programmatic access to information given by the output of CLI driven devices, such as network routers and switches, it can however be used for any such textual output.
What Exactly is a State Machine
You may have noticed that the official definition uses the word "template-based state machine" and FSM also stands for "finite state machine", but what exactly is that? In simple terms, a state machine is a system that moves from one state to another. Each state represents a part of the process and decides what the system should do next based on certain rules. For TextFSM, these states help decide how to organize and categorize the data as it reads through text. This should make sense to you once we look at some examples.
TextFSM Installation
Installing TextFSM is as simple as running pip install textfsm. As I always recommend, create a virtual environment before installing pip modules to keep them isolated from your other projects. A virtual environment is like a separate space on your computer that can have its own versions of Python libraries, so changes you make in one project don’t affect another. This way, you can manage dependencies more easily and avoid conflicts. Throughout this post, I'm using Python 3.10.12.
python -m venv venv
source venv/bin/activate

pip install textfsm
Regex
Before diving into TextFSM examples, it's important to note that understanding regular expressions (Regex) is important. While Regex deserves its own post, here's a quick recap of some of the most commonly used elements.
\d- Matches any digit, equivalent to [0-9].\D- Matches any character that is not a numeric digit.\w- Matches any word character, which includes letters, digits, and underscores, equivalent to [a-zA-Z0-9_].\W- Matches any character that is not a letter, digit or underscore.\s- Matches any whitespace character, including spaces, tabs, and line breaks.\S- Matches any character that is not a space, tab or newline..- Matches any single character except for a new line, allowing for flexibility in capturing varied text patterns.*- Follows a character and matches 0 or more occurrences of that character, making it useful for matching varying lengths of text.+- Similar to*, but it matches 1 or more occurrences.?- Makes the preceding character optional.^- Used at the start of a Regex pattern to indicate that a match must begin at the beginning of a line.$- Placed at the end of a Regex pattern to ensure that a match ends at the end of a line.
A Very Simple Example
Let's start with a very simple example. Imagine we have the output from the show ip interface brief command, and we want to parse this output to get structured data. For the sake of simplicity, I've stripped out some parts of the output as shown in the script.
Interface    Status    Protocol
Gig0/1       up        up
Gig0/2       down      down
Gig0/3       up        up
To parse this output, we need a template. A template in TextFSM is like a set of instructions that tells the parsing tool what patterns to look for in the text and how to organize the data it finds.
Now, let's write a Python script that puts the output through the template and provides us with structured output.
basic.py
import textfsm
import json

raw_output = '''Interface    Status    Protocol
Gig0/1       up        up
Gig0/2       down      down
Gig0/3       up        up'''

template_file = open('basic.textfsm')

textfsm_parser = textfsm.TextFSM(template_file)
parsed_data = textfsm_parser.ParseText(raw_output)

parsed_output = [dict(zip(textfsm_parser.header, row)) for row in parsed_data]
print(json.dumps(parsed_output, indent=4))

template_file.close()
basic.textfsm
Value Interface (\S+/\d)
Value Status (up|down)
Value Protocol (up|down)

Start
  ^${Interface}\s+${Status}\s+${Protocol} -> Record
In the above Python script, we start by loading the raw output from a network device. We then open a file named basic.textfsm from the current working directory, which contains our TextFSM template. This template is crucial as it defines how TextFSM will interpret and extract information from the raw text.
In the template, we define three key pieces of data we want to extract: the interface name, its status, and the protocol status. These are defined using the **Value keyword followed by a pattern that matches the relevant parts of each line. **
Please note that Regex is out of the scope of this post but \S+ matches any character that is not a space, tab or newline one or more times and \d matches any numeric digit.
The core of the script involves creating a TextFSM object with this template and then using it to parse the raw output. This parsing process looks at each line of the raw output and checks if it matches the patterns specified in the template If a line matches, it extracts the data and saves this data as a Record.
The output from the TextFSM parsing is initially a list of lists, where each inner list represents a single record extracted from the raw network device output. Here, each row from the data is combined with the header information retrieved from the textfsm_parser.header using the zip function, which pairs each element of the row with its corresponding header.
The dict() function then converts these pairs into dictionary entries, making each row a dictionary where the keys are the column headers and the values are the respective data points. The final result is printed in a nicely formatted JSON style.
output
[
    {
        "Interface": "Gig0/1",
        "Status": "up",
        "Protocol": "up"
    },
    {
        "Interface": "Gig0/2",
        "Status": "down",
        "Protocol": "down"
    },
    {
        "Interface": "Gig0/3",
        "Status": "up",
        "Protocol": "up"
    }
]
TextFSM Playground: Get Hands-on
Packet Coders offers a suite of tools, including Jinja2 and TextFSM parsers. You can try parsing data using their online tool below, where I've pre-loaded a template and input for you to experiment with and see how modifications affect the output.
To test out the TextFSM example just covered, click below:
Try It Out LiveUnderstanding the Template
- Value - This keyword is used to define a variable and specify the pattern to match that variable in the text. For example,
Value Interface (\S+/\d)defines a variable named **Interface **and uses the regular expression\S+/\dto match any non-whitespace characters followed by a slash and a digit. - Start - This keyword signifies the beginning of a state in the state machine. Most simple TextFSM templates will only have a Start state, but more complex parsing tasks might require multiple states. The Start state tells the TextFSM where to begin parsing, acting as the entry point for the state machine.
- Record - It's used to indicate that when a line matches the pattern specified, a record should be saved. In the context of our template,
^${Interface}\s+${Status}\s+${Protocol} -> Recordtells TextFSM that when a line starts with patterns matching the Interface, followed by Status and Protocol, this line should be extracted and stored as a record. (\s+means one or more space characters).
Each line under the Start section is a rule that describes how to match lines of text and what to do when a match is found. The caret (^) symbol at the beginning of a line pattern indicates that the matching should start from the beginning of a line.
Let’s Look at Another Example
In this section, we'll explore a more realistic example. Previously, I kept the example very simple with just three interfaces, but in reality, network device outputs often look more like the one in our second example, which includes various interface types and states.
int_brief.py
import textfsm
import json

raw_output = '''
Interface              IP-Address      OK? Method Status                Protocol
GigabitEthernet0/0/0   unassigned      YES NVRAM  administratively down down
GigabitEthernet0/0/1   unassigned      YES NVRAM  administratively down down
GigabitEthernet0/0/2   10.10.240.145   YES NVRAM  up                    up
GigabitEthernet0/0/3   unassigned      YES NVRAM  administratively down down
GigabitEthernet0/0/4   unassigned      YES NVRAM  administratively down down
Te0/1/0                10.10.240.10    YES NVRAM  up                    up
Te0/1/1                10.10.240.12    YES NVRAM  up                    up
Te0/1/2                unassigned      YES NVRAM  administratively down down
GigabitEthernet0       unassigned      YES NVRAM  administratively down down
Loopback0              10.10.10.10     YES NVRAM  up                    up
Tunnel22               192.168.100.1   YES NVRAM  up                    up'''

template_file = open('brief.textfsm')

textfsm_parser = textfsm.TextFSM(template_file)
parsed_data = textfsm_parser.ParseText(raw_output)

parsed_output = [dict(zip(textfsm_parser.header, row)) for row in parsed_data]
print(json.dumps(parsed_output, indent=4))

template_file.close()
The script we're using here is similar to the one in the previous example. We load the raw output from a network device and use a TextFSM template (brief.textfsm) to parse this data into a structured format.
brief.textfsm
Value Interface (\S+)
Value IPAddress (\d{1,3}.\d{1,3}.\d{1,3}.\d{1,3}|unassigned)
Value Status (administratively down|up|down)
Value Protocol (administratively down|up|down)

Start
  ^${Interface}\s+${IPAddress}\s+.+?${Status}\s+${Protocol} -> Record
The template is also similar but designed to handle a slightly more complex output. In the template, we've specified how to recognize different types of data. For example, the Interface field uses \S+ to capture any sequence of non-space characters, ensuring we get the entire interface name. The IPAddress field looks for a sequence of digits separated by dots or the word 'unassigned', capturing the IP address or its absence.
The fields for Status and Protocol are set to match specific words, including administratively down, up, and down, reflecting the various statuses an interface might have. Here is the output when you run the script.
[
    {
        "Interface": "GigabitEthernet0/0/0",
        "IPAddress": "unassigned",
        "Status": "administratively down",
        "Protocol": "down"
    },
    {
        "Interface": "GigabitEthernet0/0/1",
        "IPAddress": "unassigned",
        "Status": "administratively down",
        "Protocol": "down"
    },
    {
        "Interface": "GigabitEthernet0/0/2",
        "IPAddress": "10.10.240.145",
        "Status": "up",
        "Protocol": "up"
    },
    {
        "Interface": "GigabitEthernet0/0/3",
        "IPAddress": "unassigned",
        "Status": "administratively down",
        "Protocol": "down"
    },
    {
        "Interface": "GigabitEthernet0/0/4",
        "IPAddress": "unassigned",
        "Status": "administratively down",
        "Protocol": "down"
    },
    {
        "Interface": "Te0/1/0",
        "IPAddress": "10.10.240.10",
        "Status": "up",
        "Protocol": "up"
    },
    {
        "Interface": "Te0/1/1",
        "IPAddress": "10.10.240.12",
        "Status": "up",
        "Protocol": "up"
    },
    {
        "Interface": "Te0/1/2",
        "IPAddress": "unassigned",
        "Status": "administratively down",
        "Protocol": "down"
    },
    {
        "Interface": "GigabitEthernet0",
        "IPAddress": "unassigned",
        "Status": "administratively down",
        "Protocol": "down"
    },
    {
        "Interface": "Loopback0",
        "IPAddress": "10.10.10.10",
        "Status": "up",
        "Protocol": "up"
    },
    {
        "Interface": "Tunnel22",
        "IPAddress": "192.168.100.1",
        "Status": "up",
        "Protocol": "up"
    }
]
TextFSM Playground: Get Hands-on
To test out the TextFSM example just covered, click below:
Try It Out LiveUsing TextFSM with Ansible
In the previous sections, we explored how to use TextFSM with Python to parse semi-structured data from network devices. Now, let’s see how Ansible can be used to achieve similar results. This method is particularly useful if you prefer using Ansible for network automation tasks.
For this example, we’ll use a playbook that reads from a text file, but you can also directly execute commands on network devices and use the output for parsing. Here’s the playbook we are using.
---
- name: Parse network device output from a file using TextFSM
  hosts: localhost
  gather_facts: no

  tasks:
    - name: Read output from a text file
      ansible.builtin.set_fact:
        command_output: "{{ lookup('file', 'output.txt') }}"

    - name: Parse the command output using TextFSM
      ansible.utils.cli_parse:
        text: "{{ command_output }}"
        parser:
          name: ansible.utils.textfsm
          template_path: "brief.textfsm"
      register: parsed_output

    - name: Display the parsed data
      debug:
        msg: "{{ parsed_output['parsed'] }}"
Task 1 - Read Output from a Text File
This task uses the lookup plugin to read the contents of output.txt. This file is expected to contain the raw output from a network command, similar to what you would get if you ran the command directly on a device.
Task 2 - Parse the Command Output Using TextFSM
The ansible.utils.cli_parse module is then used to parse this text. We specify text as the input parameter, which means the module expects plain text that needs parsing. We also specify the path to our TextFSM template, which contains the parsing rules defined similarly to what we discussed earlier. The parsed results are then registered under the variable parsed_output.
Task 3 - Display the Parsed Data
Finally, the parsed data is displayed using the debug module. This output shows the structured data extracted from the original raw text, formatted as defined by the TextFSM template.
PLAY [Parse network device output from a file using TextFSM] ***********************************************

TASK [Read output from a text file] ***********************************************
ok: [localhost]

TASK [Parse the command output using TextFSM] ***********************************************
ok: [localhost]

TASK [Display the parsed data] ************************************************
ok: [localhost] => {
    "msg": [
        {
            "IPAddress": "unassigned",
            "Interface": "GigabitEthernet0/0/0",
            "Protocol": "down",
            "Status": "administratively down"
        },
        {
            "IPAddress": "unassigned",
            "Interface": "GigabitEthernet0/0/1",
            "Protocol": "down",
            "Status": "administratively down"
        },
        {
            "IPAddress": "10.10.240.145",
            "Interface": "GigabitEthernet0/0/2",
            "Protocol": "up",
            "Status": "up"
        },
        {
            "IPAddress": "unassigned",
            "Interface": "GigabitEthernet0/0/3",
            "Protocol": "down",
            "Status": "administratively down"
        },
        {
            "IPAddress": "unassigned",
            "Interface": "GigabitEthernet0/0/4",
            "Protocol": "down",
            "Status": "administratively down"
        },
        {
            "IPAddress": "10.10.240.10",
            "Interface": "Te0/1/0",
            "Protocol": "up",
            "Status": "up"
        },
        {
            "IPAddress": "10.10.240.12",
            "Interface": "Te0/1/1",
            "Protocol": "up",
            "Status": "up"
        },
        {
            "IPAddress": "unassigned",
            "Interface": "Te0/1/2",
            "Protocol": "down",
            "Status": "administratively down"
        },
        {
            "IPAddress": "unassigned",
            "Interface": "GigabitEthernet0",
            "Protocol": "down",
            "Status": "administratively down"
        },
        {
            "IPAddress": "10.10.10.10",
            "Interface": "Loopback0",
            "Protocol": "up",
            "Status": "up"
        },
        {
            "IPAddress": "192.168.100.1",
            "Interface": "Tunnel22",
            "Protocol": "up",
            "Status": "up"
        }
    ]
}

PLAY RECAP ********************************************
localhost                  : ok=3    changed=0    unreachable=0    failed=0    skipped=0    rescued=0    ignored=0
Netmiko and ntc_templates
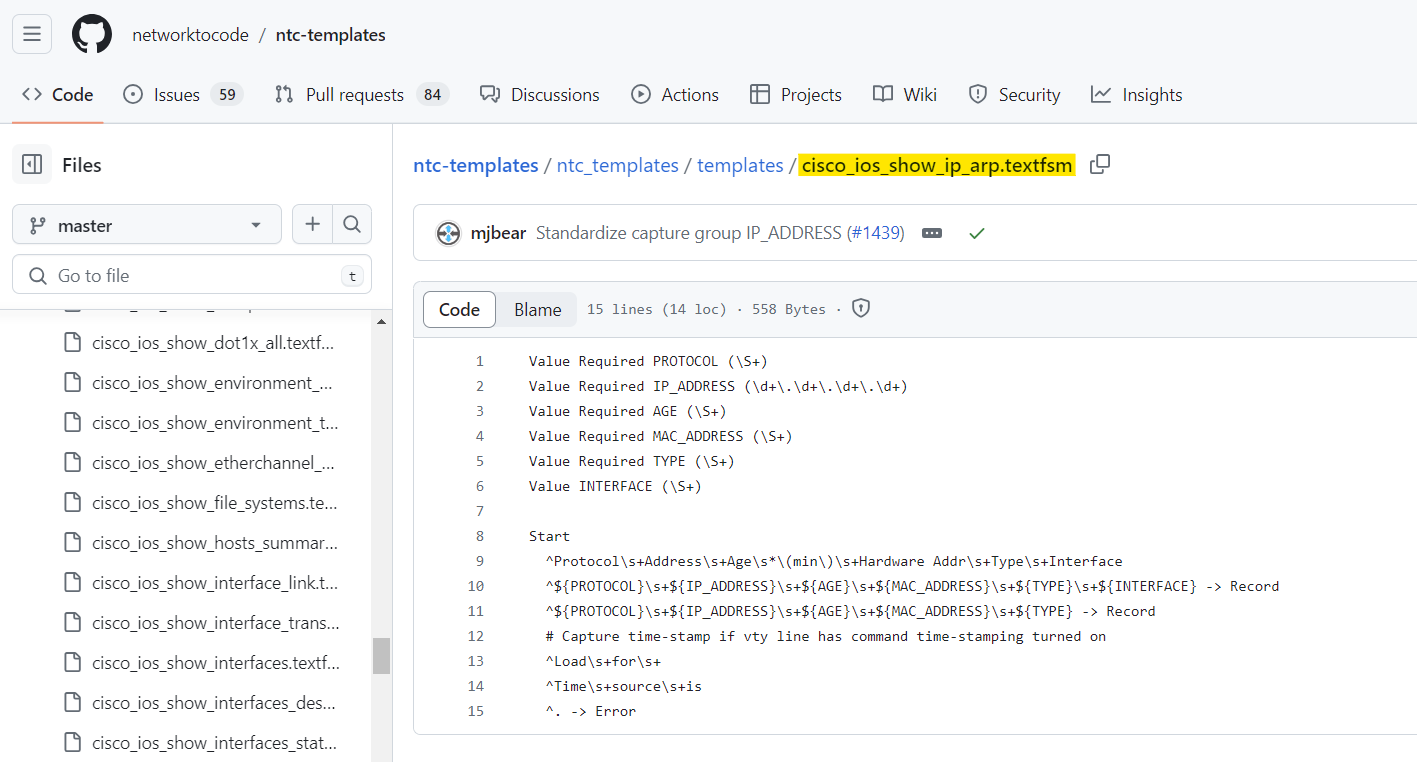
If you're managing networks with devices from various vendors like Cisco, Arista, Juniper, or Palo Alto, you might wonder if you need to create a TextFSM template for every different command output. The good news is, you don't have to. There's a helpful repo on GitHub called ntc_templates that has a collection of pre-built templates for many common network commands across different vendors. This repository is managed by the community.
For example, for Cisco's show ip arp command, there's already a template made by the community that parses the output. This makes it much easier for you to get structured data from varied network device outputs without having to start from scratch.
Netmiko, a well-known Python library, simplifies SSH management for network devices and integrates with TextFSM to parse command outputs easily. By using the use_textfsm=True parameter with the send_command method, Netmiko automatically processes the command output using a suitable TextFSM template. This turns the usual raw text output into a structured format, specifically, a list of dictionaries where each dictionary represents a line from the output, with keys corresponding to fields defined in the template.
from netmiko import ConnectHandler
import pprint

cisco_01 = {
    "device_type": "cisco_ios",
    "host": "192.168.100.120",
    "username": "admin",
    "password": "admin"
}

connection = ConnectHandler(**cisco_01)

output = connection.send_command('show ip interface brief', use_textfsm=True)
pprint.pp(output)

connection.disconnect()
[{'interface': 'GigabitEthernet1',
  'ip_address': '10.0.0.15',
  'status': 'up',
  'proto': 'up'},
 {'interface': 'GigabitEthernet2',
  'ip_address': '192.168.10.1',
  'status': 'up',
  'proto': 'up'},
 {'interface': 'GigabitEthernet3',
  'ip_address': '192.168.11.1',
  'status': 'up',
  'proto': 'up'},
 {'interface': 'Loopback0',
  'ip_address': '1.1.1.1',
  'status': 'up',
  'proto': 'up'}]
Closing Up
As we've explored in this post, TextFSM is a powerful tool for parsing semi-structured data from network devices. It provides a systematic way to convert raw text into structured data, making it easier to manage and use within various network automation tasks.
Using TextFSM to convert raw data to structured output is particularly useful in situations where other APIs might not provide the required data in a structured format. For instance, your REST API might not support retrieving data for specific queries. With TextFSM, you can create your own templates for the output of legacy CLI commands, offering a significant amount of flexibility.
Looking to Learn More?
Looking to learn more about TextFSM? If so, checkout out our members-only tech-session where we dive into TextFSM further, including:
⭐ TextFSM features and components.
⭐ Using TextFSM with Scrapli.
⭐ Comparing TextFSM with other open-source parsing tools.
⭐ Access to various pre-built examples and scripts.
Click here to learn more about getting access to this tech-session.
Sponsored by