
Within this post, we will show you how to build a virtualized NSX SDN lab.
Our lab will be loosely based around the VMware NFV 2.0.1 Reference Architecture.
For those of you who haven't worked with the VMware NFV reference architecture, it consists of a set of validated VMware software components and high-level design reference.
Note:
- This guide assumes you have a good understanding of NSX.
- With regards to NSX licensing, checkout VMUG for personal/non-production licensing: https://www.vmug.com/Join/EVALExperience
Summary of Steps
The lab will be built based on the following steps:
- Building the VMware Infra (ESXi hosts and vDS's).
- Deploy the NSX Manager via OVF.
- Register the NSX Manager with the vCenter server.
- Deploy the NSX Control Cluster.
- Deploy VXLAN (via VIB) to the hosts.
- Verify connectivity between 2 VMs across a logical switch.
Lab Details
Overview
The lab will consist of 2 x physical ESXi servers. The first ESXi server will host the management components, and the other ESXi server will host a number of virtualized ESXi servers used for compute and Edge (ESG's). ESGs being VMs that will perform breakout from the overlay (VXLAN) to the underlay.
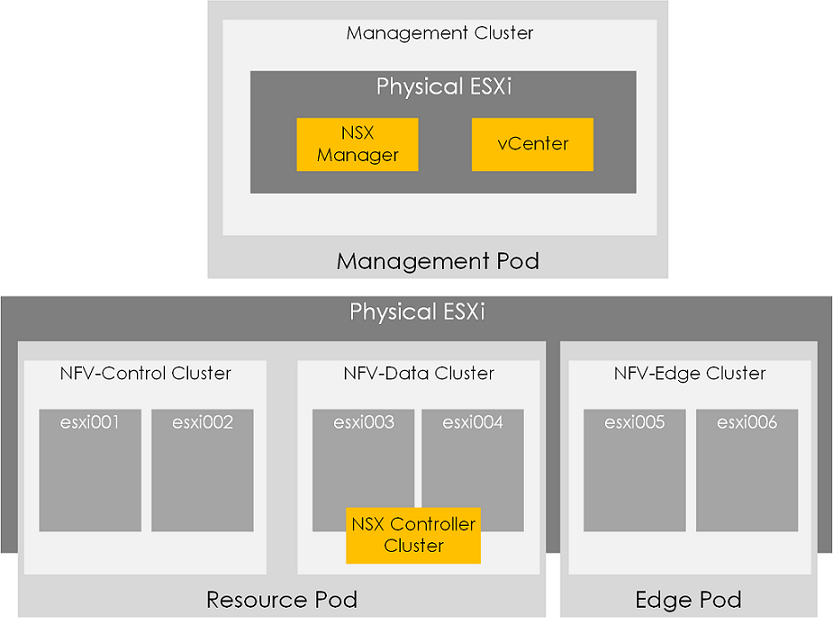
Figure 1 - Lab overview.
Components
Our lab will be based on the following components.
| Physical Host | VM | Nested VMs | vCPU | Memory | HDD |
|---|---|---|---|---|---|
| Management ESXi | vCenter | 2 | 4Gb | 120GB | |
| NSX Manager | 4 | 16Gb | 60GB | ||
| Compute ESXi | ESXi001 | 2 | 8Gb | 40GB | |
| ESXi002 | 2 | 8Gb | 40GB | ||
| ESXi003 | 2 | 8Gb | 40GB | ||
| ESXi004 | 2 | 8Gb | 40GB | ||
| ESXi005 | 2 | 16Gb | 100GB | ||
| ESXi006 | 2 | 16Gb | 100GB | ||
| NSX Controller (x3) | 4 | 4Gb | 28GB |
vSphere Setup
First of all, we will build the vSphere infra. This involves installing the ESXi hosts, creating the required clusters and building our vDS's.
Requirements
Before we begin the following requirements much be performed.
- ESXi installed on each of the physical hosts.
- vCenter installed.
Furthermore, the following services must be available:
- DNS for internal resolution of VMware components i.e VC etc.
- NTP for time synchronization.
Create Clusters
From within vCenter create the following clusters,
- NFV-Data
- NFV-Control
- NFV-Edge
Build ESXi Hosts
Create 6 virtual ESXi VMs.
- 8Gb RAM, 2 x vCPUs and 100GB disk.
- Enable VT-x under the CPU section.
- Create 2 x NICs on each VM.
- Assign a trunk based port group to each interface.
- Upon the vSS on the physical host used for compute, set promiscuous mode to enabled.
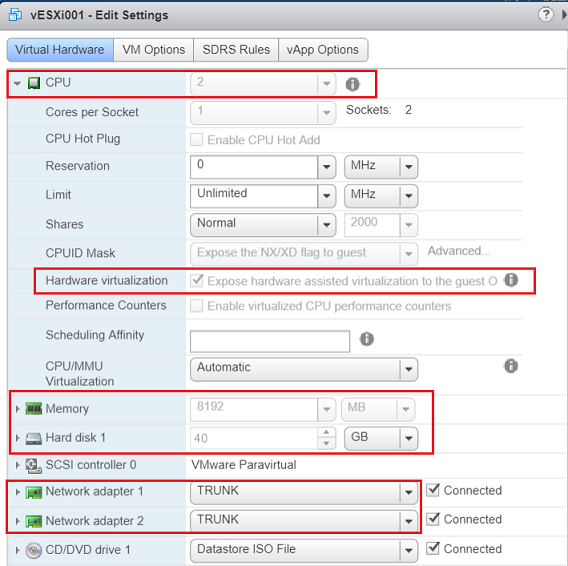
Figure 2 - Create ESXi VM's.
Once you've created them, install ESXi6.5 on each. Once installed:
- Configure DNS resolution.
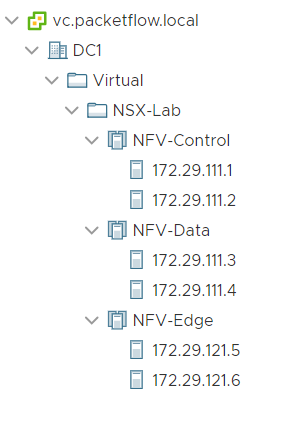
- Configure the following IP and VLAN tags against the management interface, based on the below.
| ESX VM | IP/MASK | VLAN | Cluster |
|---|---|---|---|
| ESXi001 | 172.29.111.1 | 111 | NFV-Control |
| ESXi002 | 172.29.111.2 | 111 | NFV-Control |
| ESXi003 | 172.29.111.3 | 111 | NFV-Data |
| ESXi004 | 172.29.111.4 | 111 | NFV-Data |
| ESXi005 | 172.29.121.5 | 121 | NFV-Edge |
| ESXi006 | 172.29.121.6 | 121 | NFV-Edge |
Update Clusters
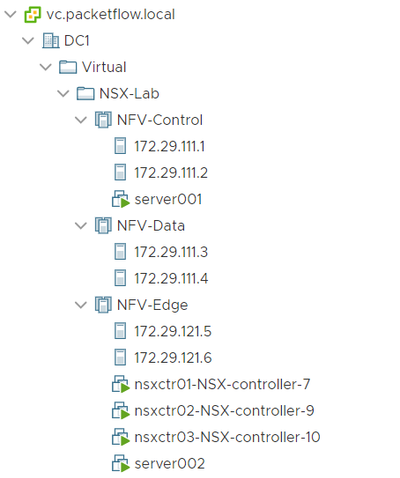
Next, import each of the hosts into vCenter. Resulting in the following vSphere topology:
vSphere Networking
Now, at this point, each ESXi host VM will be only using a single VMNIC and the virtual standard switch (vSS). Therefore our next action will be to migrate the ESXi over to a vDS and to use both VMNIC uplinks. To do this, within the network section of vCenter go to Add and Manage Hosts. This will start a wizard where you can attach your hosts, assign uplinks and configure the required VLANs (shown below).
| vDS | PortGroup | VLAN |
|---|---|---|
| vDS-Resource-Infra | PG-Resource-Infra-Mgmt | 111 |
| PG-Resource-Infra-VMMgmt | 112 | |
| vDS-Edge-Infra | PG-Edge-Infra-Mgmt | 121 |
| PG-Edge-Infra-VMMgmt | 122 |
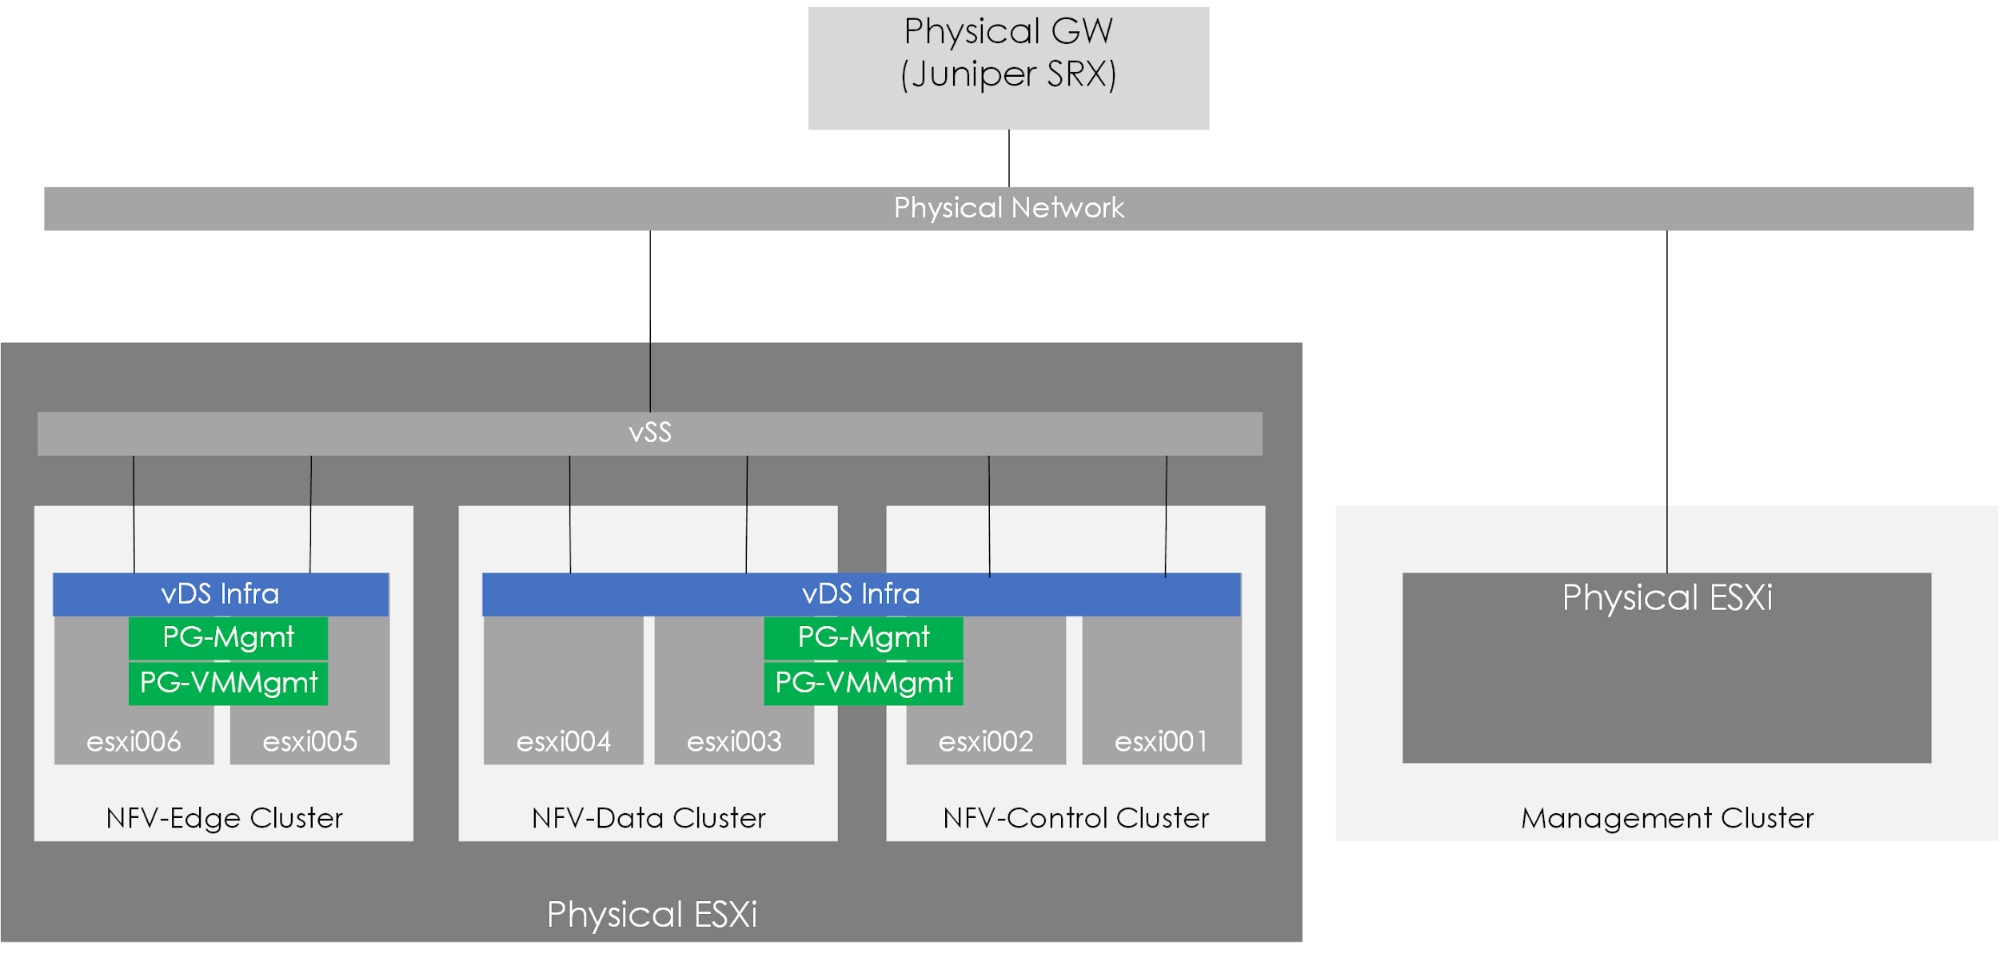
Figure 3 - vSphere networking overview.
What's Next?
Now that we have the vSphere infra up and running, we can look to start the NSX installation, covered within part 2 of this 4 part series.
Sponsored by